
If your bathroom aesthetic no longer excites you or is in desperate need of an update to bring it into this century, upgrading the vanity is a great way to give the space a boost. Removing your bathroom sink vanity may seem like a big task, but if you follow these steps, this DIY project can be easily knocked out in a single weekend.
Preparing to Replace Your Bathroom Vanity
It’s a good idea to have a plan for what to do with your vanity after removing it. You may be able to donate or give away your used sink and vanity if it isn’t too outdated to Habitat for Humanity or list for free pickup on Facebook Marketplace or Craigslist. If it’s worn out, you may be able to put it out to the curb. However, if tearing out your vanity is just the start of a major bathroom makeover, you may want to consider renting a dumpster to handle your home renovation debris .
Before you jump into the dirty work of this job, there a few things you do to protect the rest of your bathroom from the dust and debris.
How Much Does It Cost to Replace a Bathroom Vanity?
DIY bathroom vanity removal should be cost-free as long as you have the tools on-hand needed for the project. The part that will cost you is replacing your vanity with a new one. According to HomeAdvisor.com , installing a new bathroom vanity will cost you between $300 to $3,800, depending on what style vanity you decide on.
Tools and Gear Needed to Remove a Bathroom Vanity
A free-standing vanity will be a little less work to remove than a wall-mounted version, but either job can be done with proper research and the right tools and gear to complete the job:
How to Remove Your Bathroom Vanity in Six Steps
1. Disconnect the Plumbing
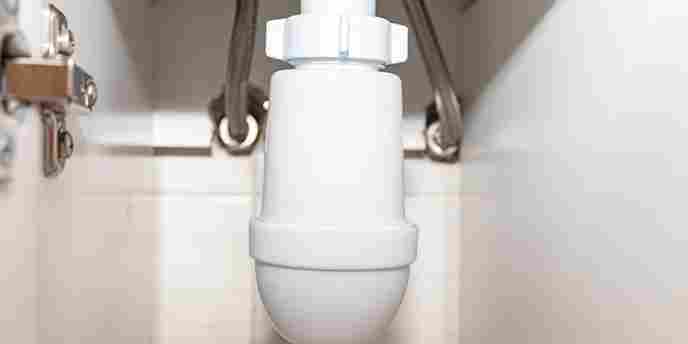
How to Remove a Vanity with Floor Plumbing
The plumbing for most bathroom sinks is usually routed through the wall. But sometimes, especially if the bathroom wall is on an outside wall, the plumbing for your vanity may be in the floor instead. This is often to prevent outdoor temperatures from freezing the pipes. If the plumbing in your vanity is in the floor instead of the wall, use these steps to remove your vanity once you’ve disconnected the plumbing.
2. Take Down the Vanity Mirror
Now that your plumbing is under control, it’s time to move to the mirror. If your mirror is a separate piece and you are planning on replacing it, take it down before you start the vanity removal. Make sure to put on your gloves and safety glasses and have someone available to help for this step to ensure you can safely remove the mirror without dropping or shattering it.
Removing a Mirror That is Glued to the Wall
3. Remove Tile or Backsplash
Once your wall is mirror-free, it’s time to remove your tile and backsplash.
4. Detach Sink Hardware or Take Off the Vanity Top
Next, it’s time to get rid of your old bathroom sink hardware, or if your sink and vanity top are one piece, take off your entire vanity top.
How to Disconnect Your Bathroom Sink & Hardware
How to Remove the Vanity Top
5. Remove Bathroom Vanity from the Wall
Once the sink and vanity top are gone, you can easily access the vanity cabinet that is left. Figure out where the cabinet is attached to the wall and if the countertop is attached to the wall with screws or nails.
When fasteners are removed, the vanity cabinet should be easy to remove from the wall. If it’s too large to fit through your doorway and you aren’t planning to reuse, you may need to use a reciprocating saw to cut into smaller pieces.
6. Clean Up Your Debris and Repair Your Wall
The tough part is over, time to move on to the cleanup and repairing any damage to your walls or floor.
What’s Next?
It’s time for some fresh paint and replacing your bathroom vanity with a new fixture to give your bathroom the update you were dreaming of.
If you are planning on going into full bathroom remodel mode after removing your vanity, check out our complete guide on how to remodel your bathroom from start to finish .